Pumpkin Patchwork
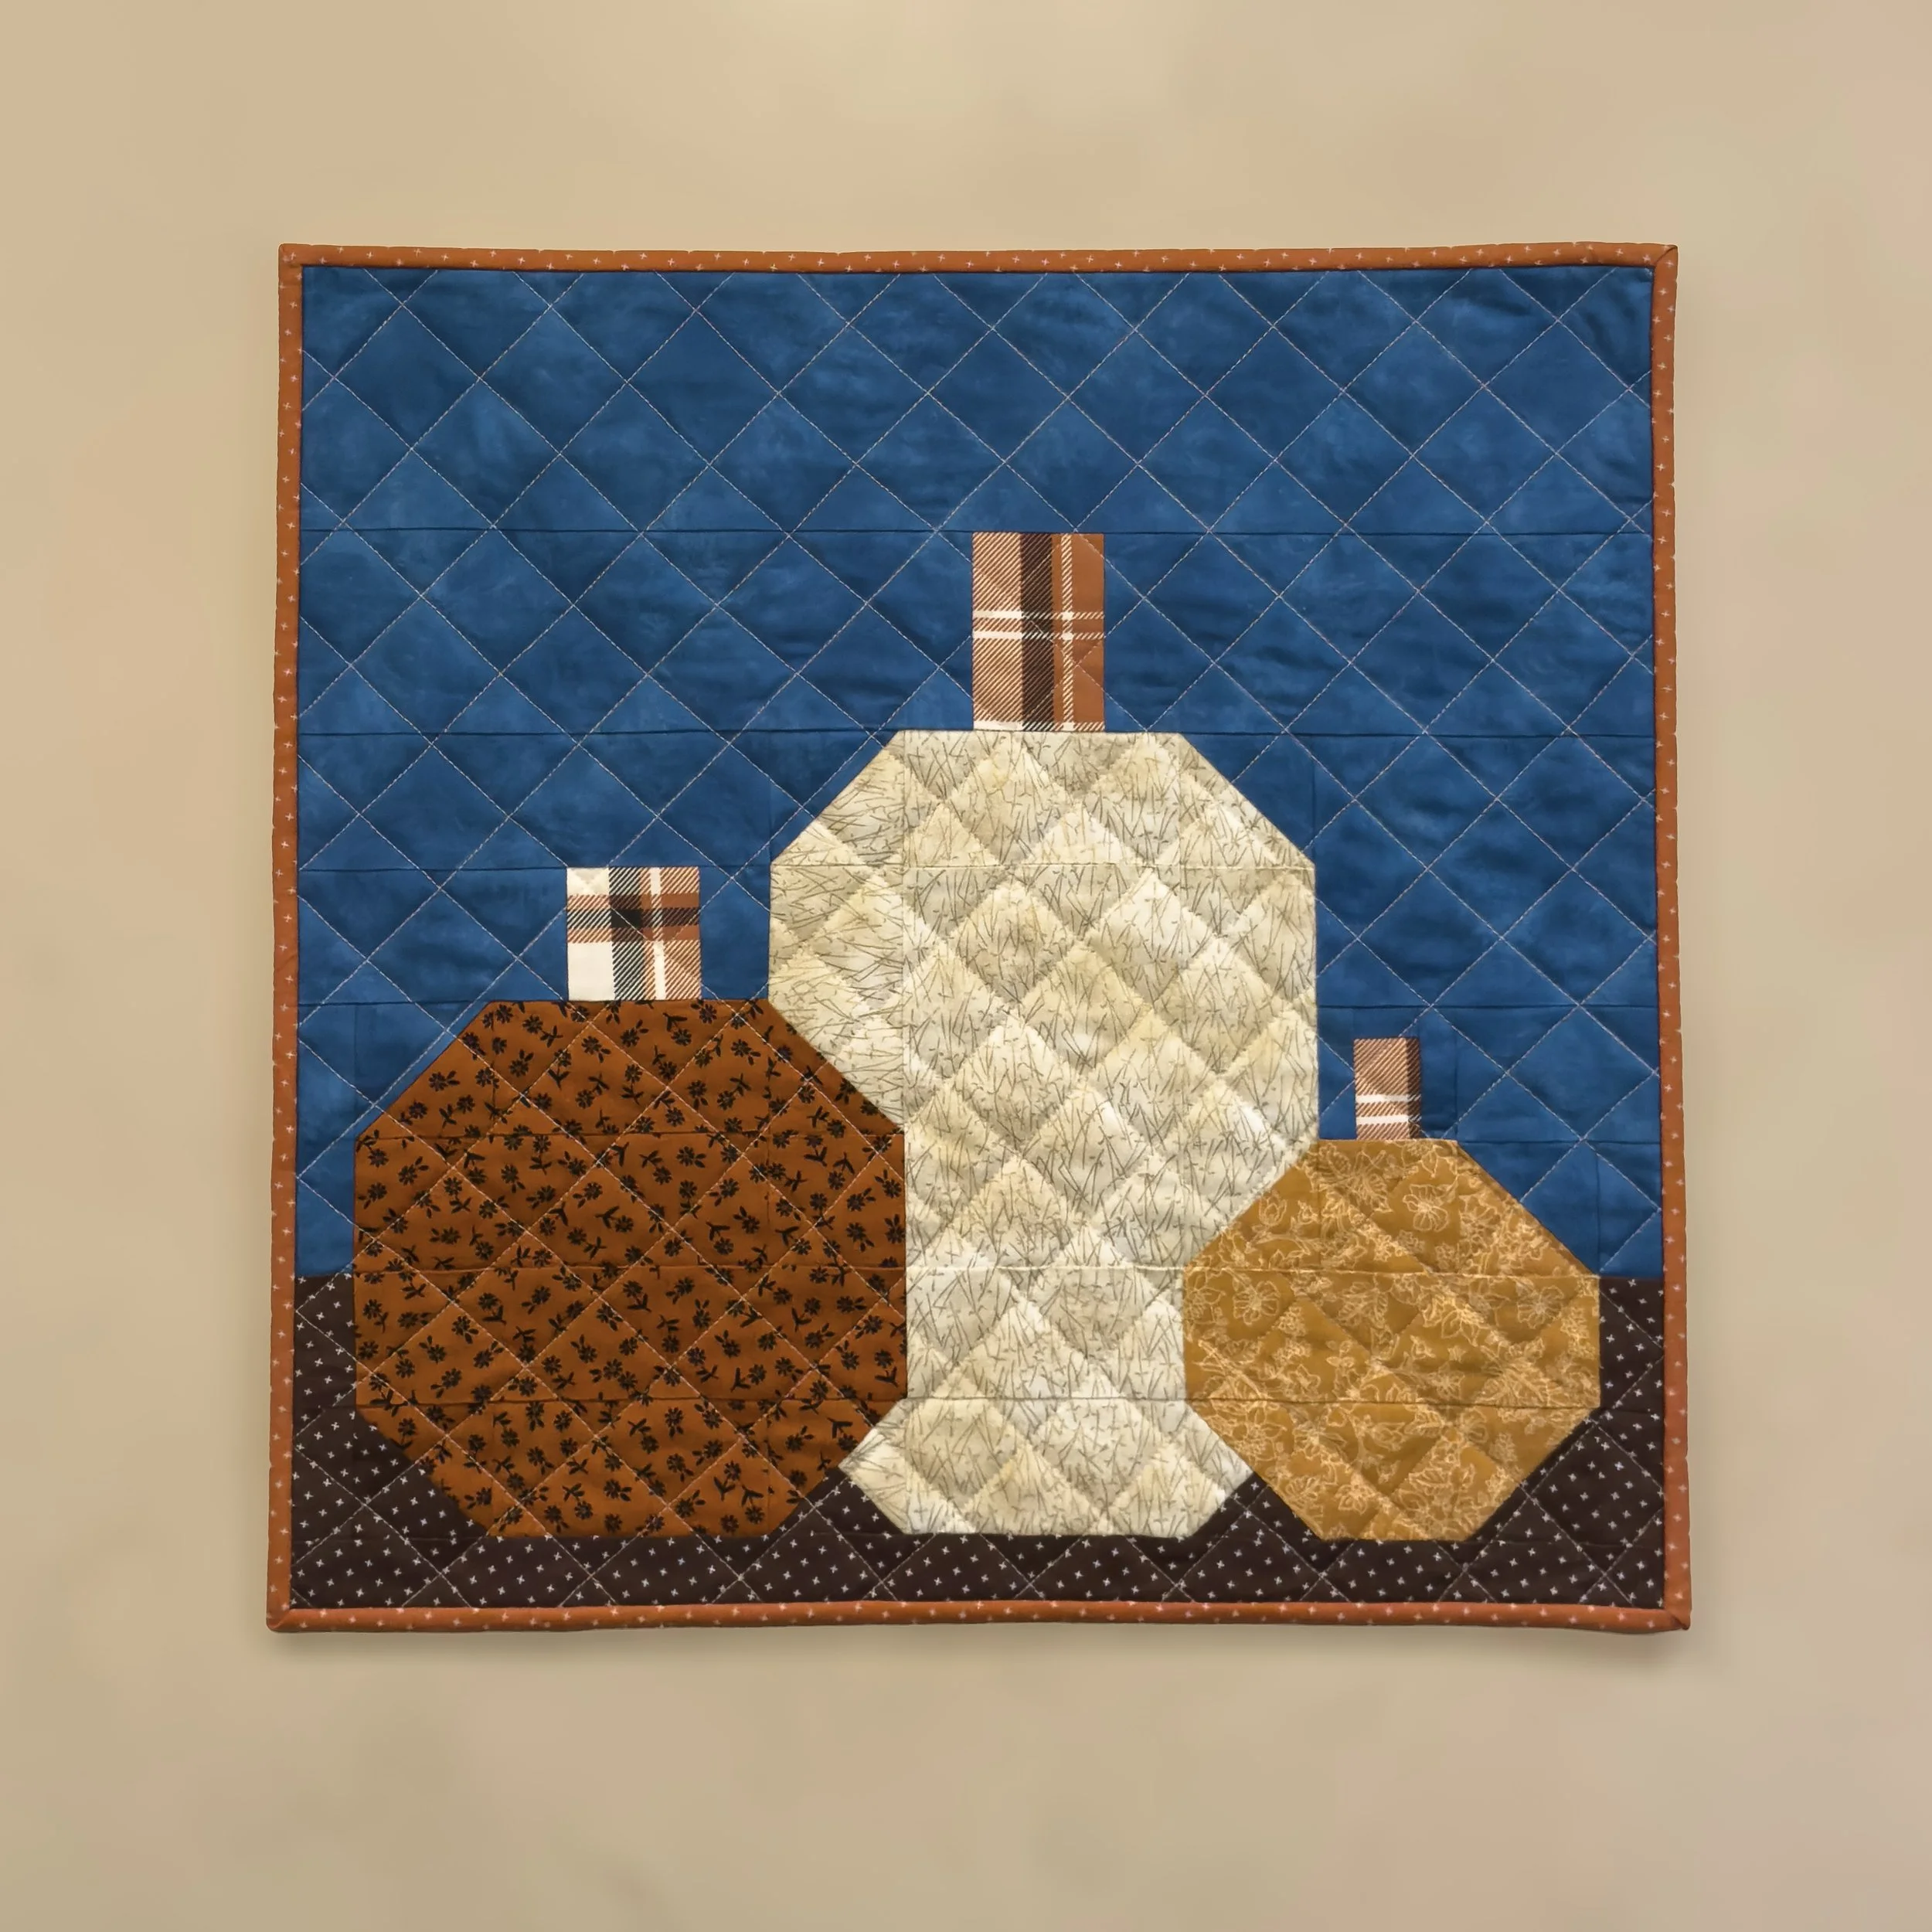
Welcome Fall with this charming 20” x 20” Pumpkin Patchwork mini quilt
There is something magical about sewing for the seasons and this pumpkin patchwork mini quilt is the perfect way to celebrate Fall. Whether you hang it on a wall or use it as a festive table topper, this quilt brings cozy autumn vibes into your home.
I designed this as a fun art quilt project—something small enough to finish in a weekend, but with enough personality to make a big impact. It’s beginner-friendly and uses basic techniques to create a trio of pumpkins. It’s a great way to play with Fall colors, work through your scraps, or showcase some favorite solids.
In this tutorial, I’ll walk you through everything you need to make your own version—from cutting, piecing, quilting and finishing. Let’s stitch something seasonal and special!
Materials
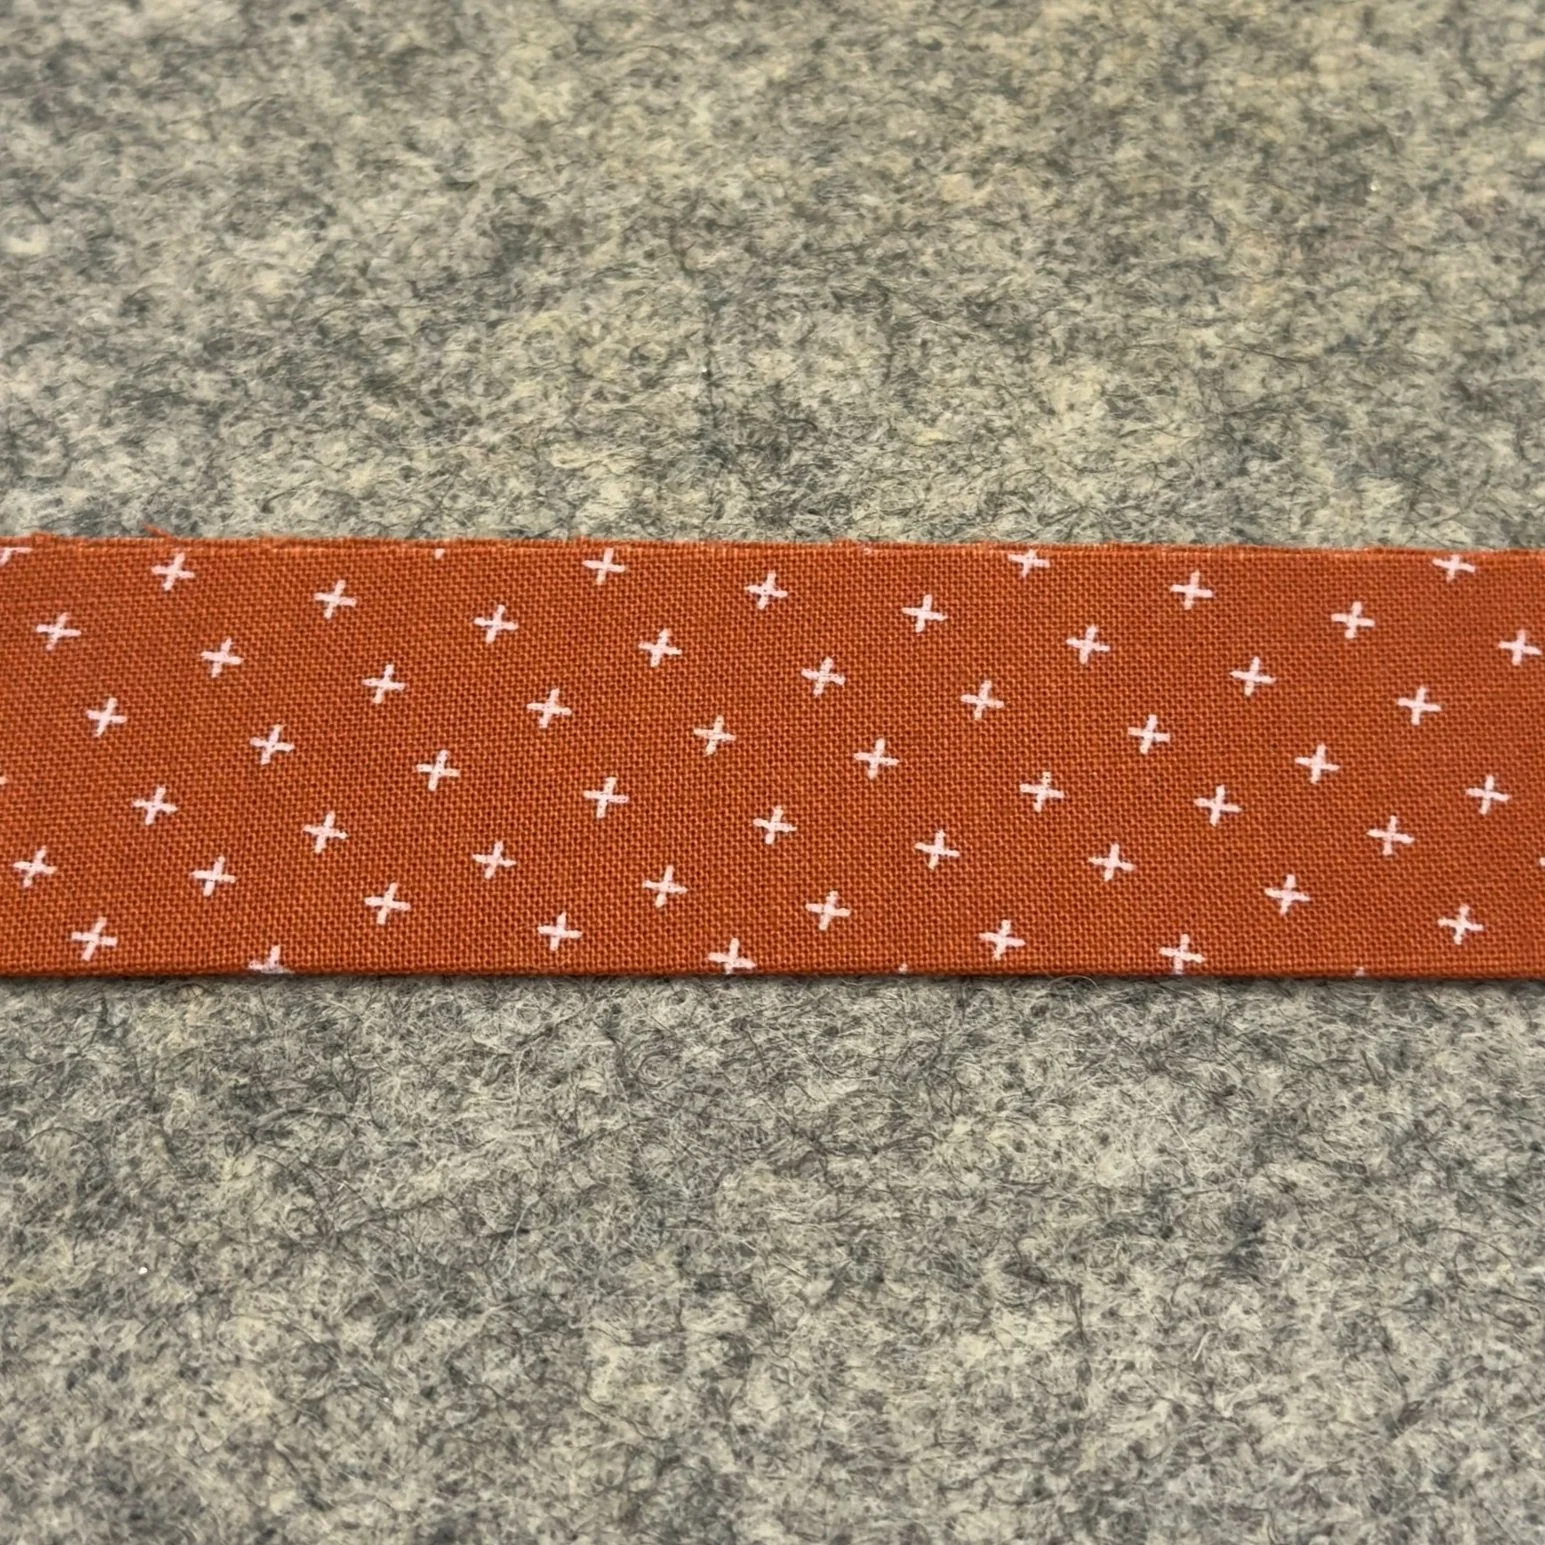
Fabric: This project is a great scrap buster, but let’s be honest - shopping for new fabric is always fun too. This project is fat quarter friendly! You’ll need just 7 fat quarters, one for each color used in the quilt. If you prefer yardage the fabric requirements are: Sky - 1/4 yard, Ground - 1/8 yard, Pumpkin 1 - 1/8 yard, Pumpkin 2 - 1/8 yard, Pumpkin 3 - 1/8 yard, Stems - 1/8 yard. Binding - 1/4 yard (if using yardage, cut 3 strips measuring 2 1/2” x 42” for the binding).
Batting - 24” x 24”
Backing - 24” x 24”
Coordinating thread
Basic quilting tools (sewing machine, iron, ruler, rotary cutter, cutting mat, pencil, etc.)
Supplies for adding applique (optional)
Cutting Instructions
Before cutting your fabric iron it flat.
Follow the table and/or the fat quarter cutting diagram below to cut your fabric pieces.

WOF = Width of Fabric
Piecing
Half-Square Triangles (HST)
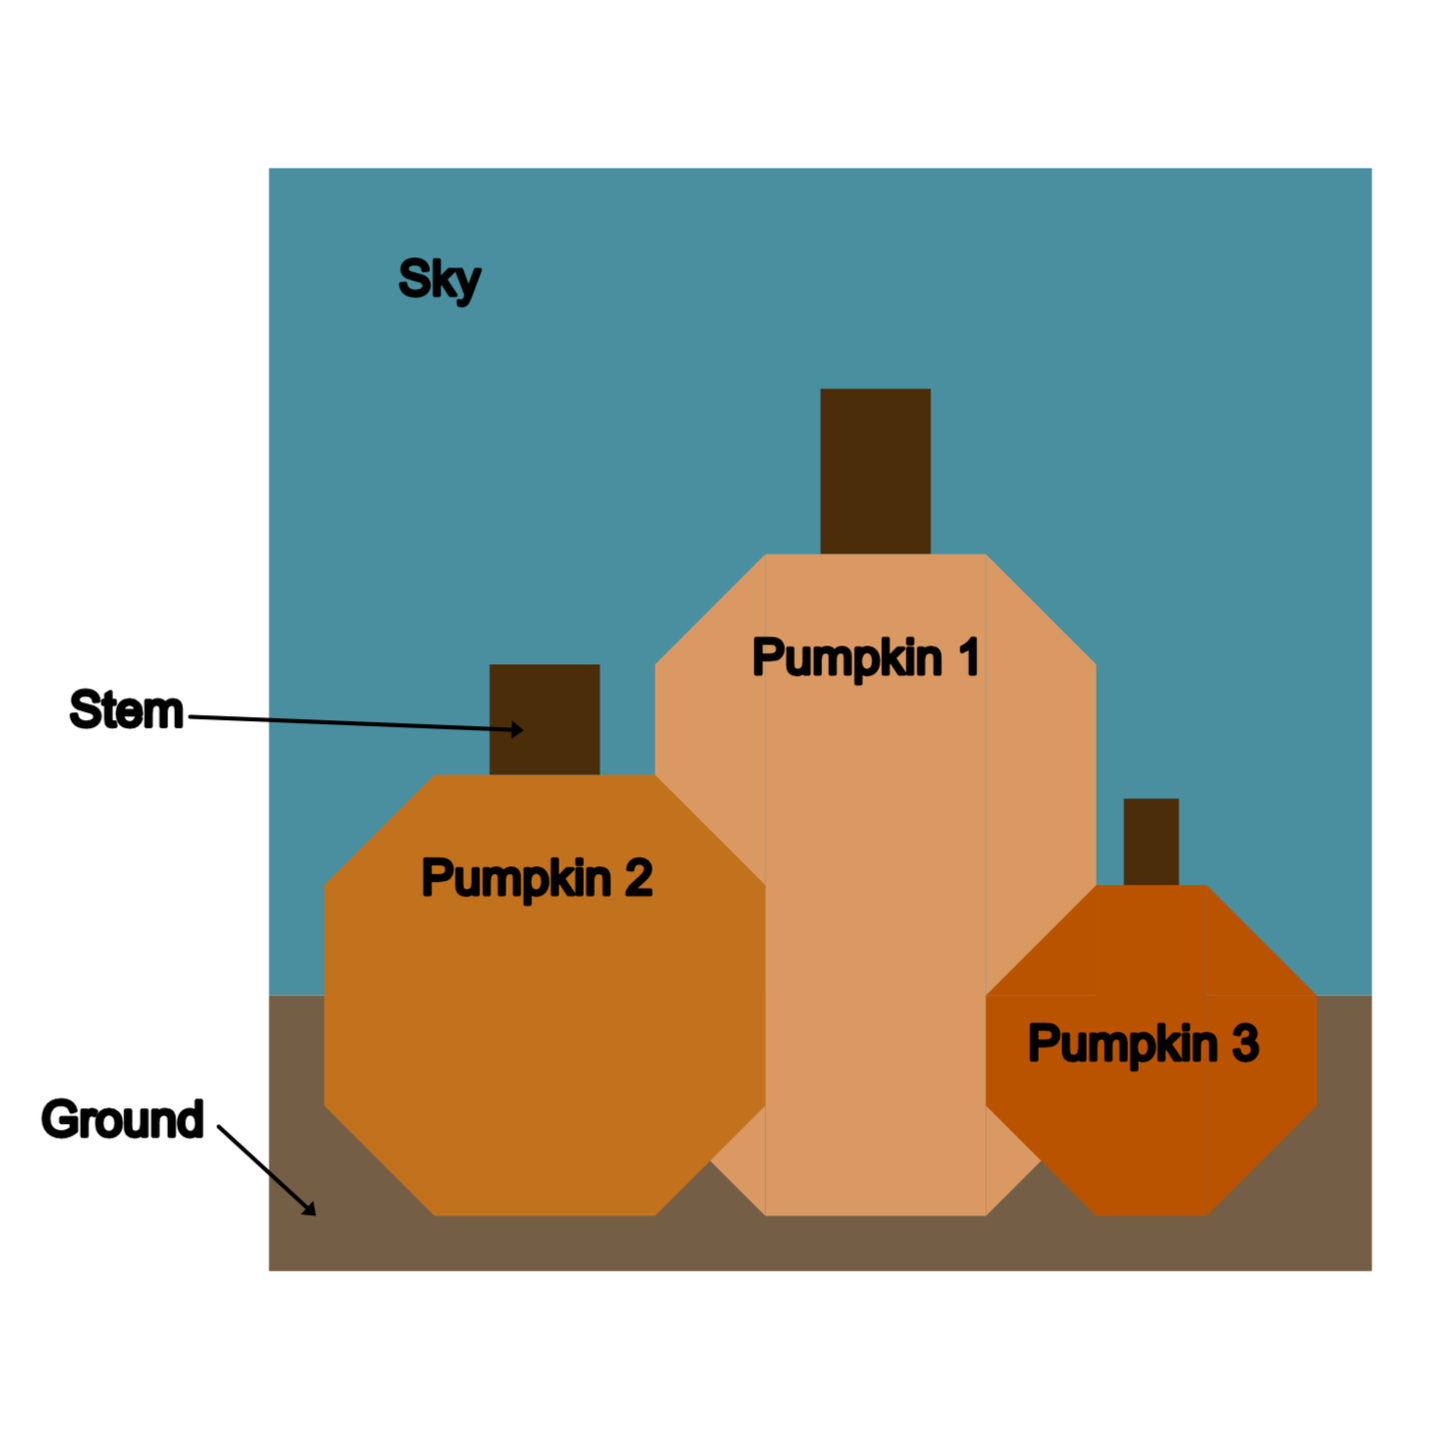
We will start the piecing process by making two-at-a-time half-square triangles (HSTs). To make these you will need the 3” sky, ground, and pumpkin squares.
Pair a 3” sky square with a 3” pumpkin 1 square. Place the lighter fabric square right side down. Using a ruler and pencil, draw a diagonal line from one corner to the opposite corner.
Layer the squares on top of each other so the right sides of the fabric are together and the drawn line is on top. Pin if needed to keep the layers aligned.
Using a 1/4” seam allowance stitch a line on both sides of the drawn line (you’ll have two stitched lines).
Use a rotary cutter and ruler to cut directly on the drawn line, separating the unit into two triangles.
Open each triangle and press the seam toward the darker fabric (or open if preferred). You now have two half-square triangles!
Use a square ruler to trim each HST to 2 1/2” x 2 1/2”. Align the diagonal seam with the 45 degree line on your ruler for accuracy.


Repeat these steps making five more sets of HSTs with the following 3” square pairings. Sky & pumpkin 2, sky & pumpkin 3, ground and pumpkin 1, ground & pumpkin 2, ground & pumpkin 3.


This will create twelve HST’s. Not all of these are necessary for this project. We will not need one of the sky/pumpkin 2, sky/pumpkin 3, ground/pumpkin 2 and ground/pumpkin 3 HSTs. Keep these to use in your next scrappy project.
Stitch and Flip
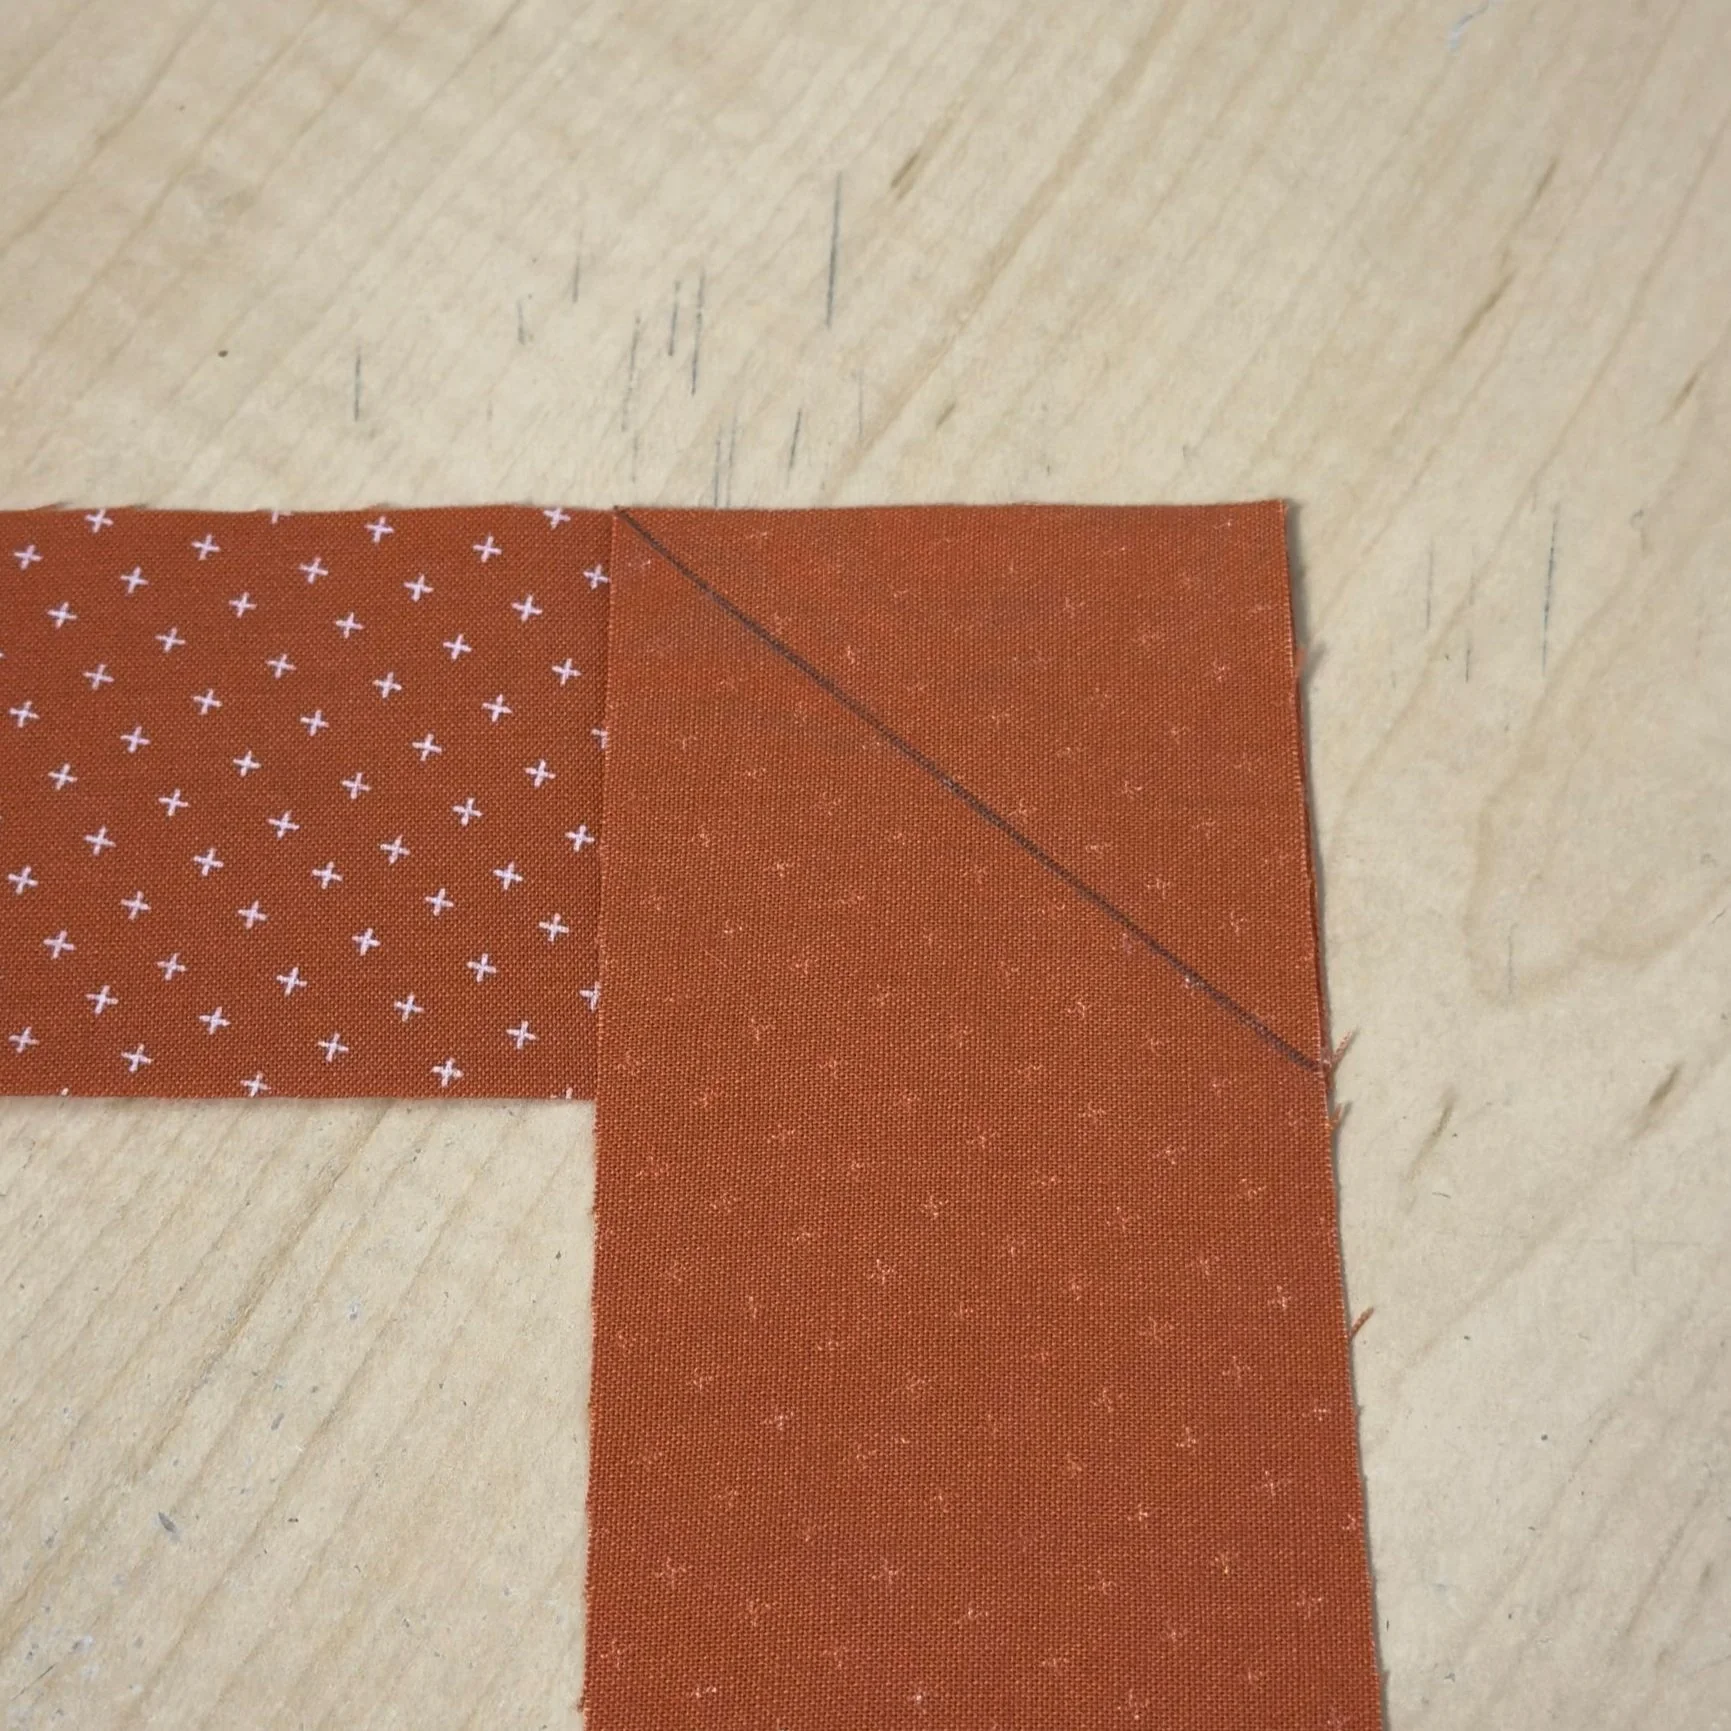
The stitch and flip method is a simple way to add triangles or angled shapes to the corner of a block. We will be making four of these. For our first stitch and flip unit we will need one of the ground/pumpkin 1 HSTs from the previous step, and a 2 1/2” pumpkin 2 square.
Place the 2 1/2” pumpkin 2 square right side down. Using a ruler and pencil, draw a diagonal line from one corner to the opposite corner.
Place one of the ground/pumpkin 1 HSTs face up so that the ground fabric is on the bottom left side of the square. Layer the Pumpkin 2 square on top right sides together with the drawn line running from the top right corner to the bottom left corner. Refer to the diagrams below to help get the positioning correct.
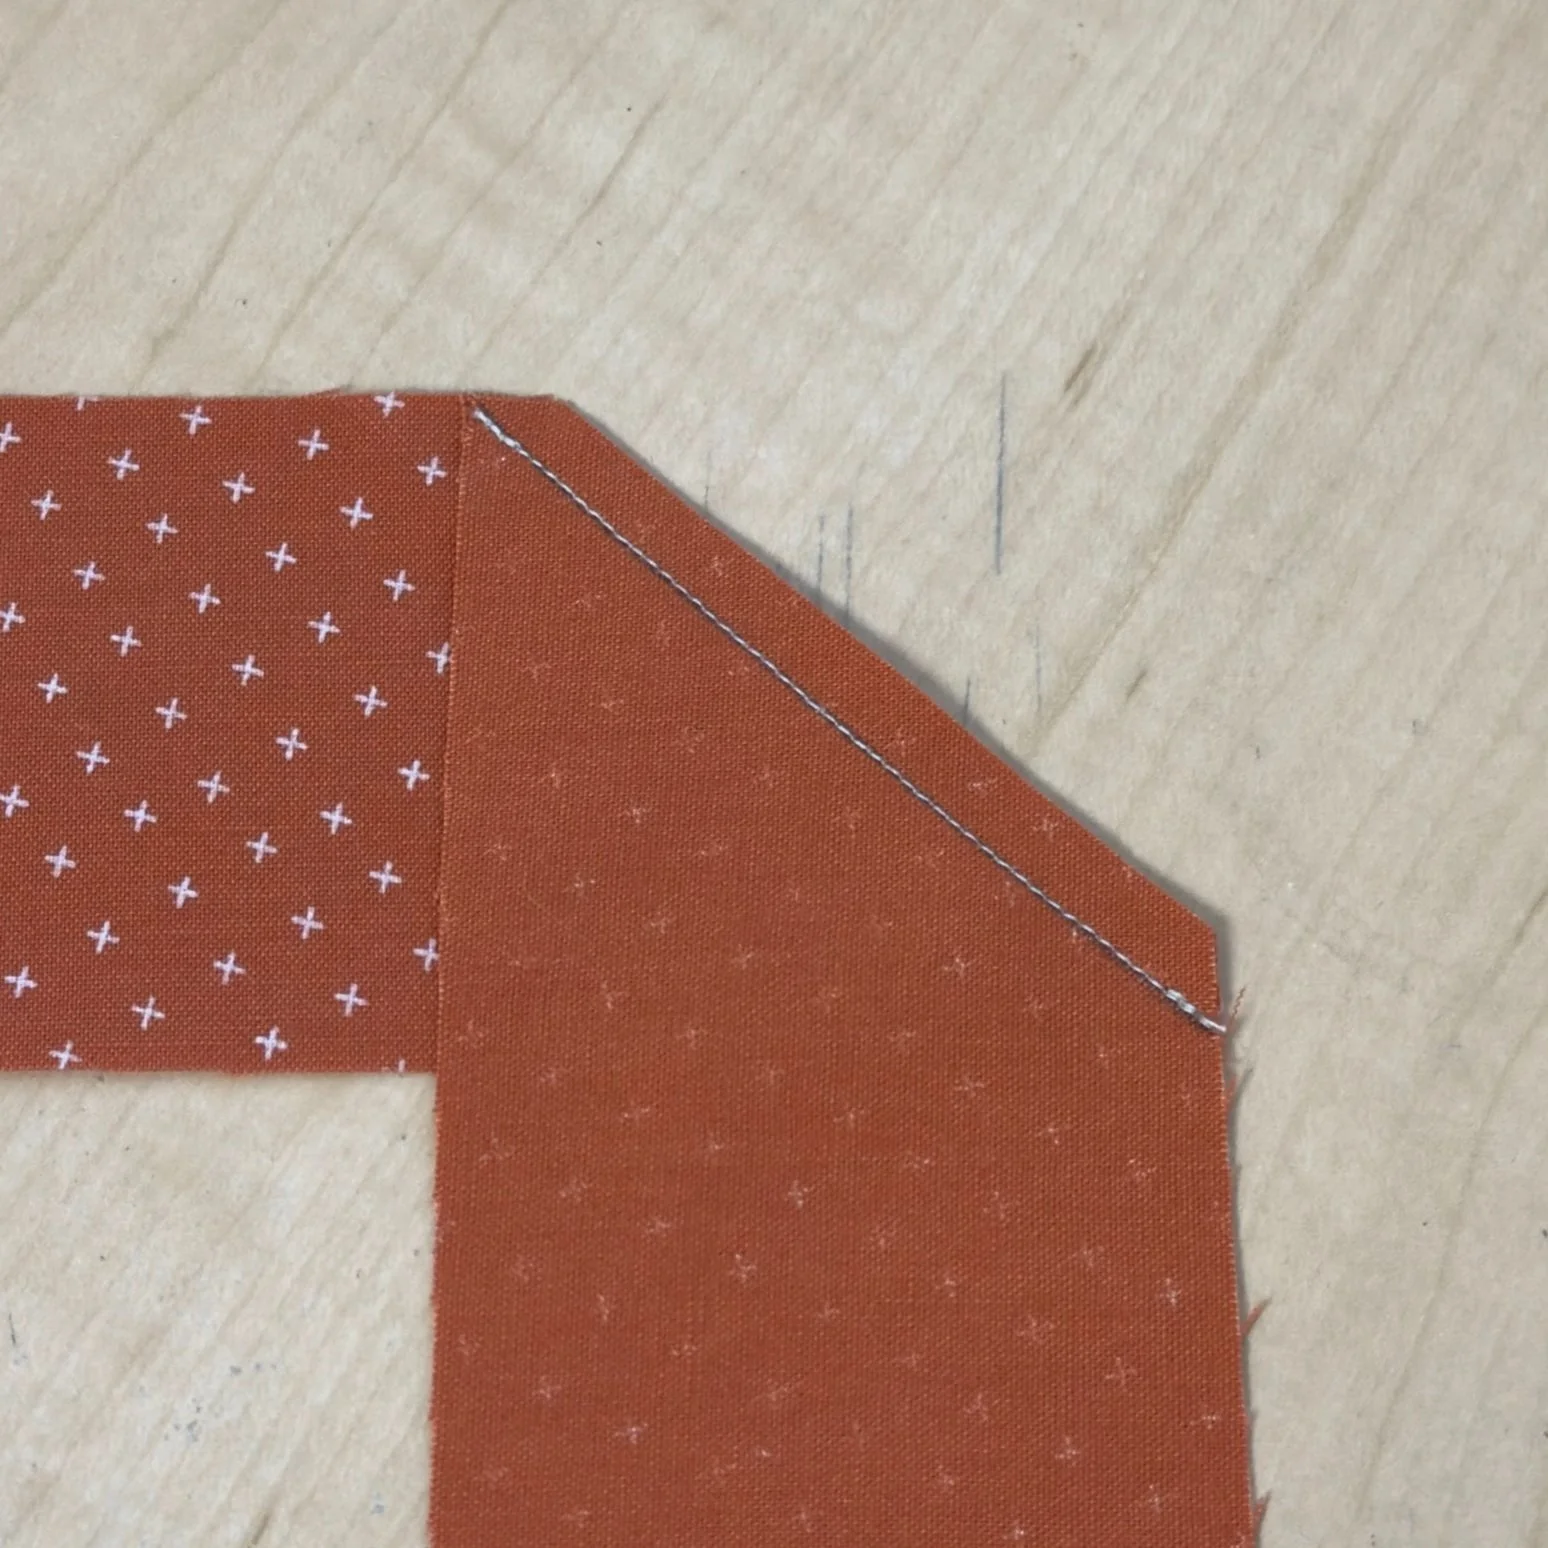
Stitch directly on top of the drawn line.
Using a ruler and rotary cutter, trim 1/4” away from the seam line on the top left corner, cutting off the excess fabric.
Flip the triangle open and press the seam toward the corner. This stitch and flip unit is finished!
Repeat these steps with the other ground/pumpkin 1 HST and a 2 1/2” pumpkin 3 square. Use the diagram below to get the proper orientation for the HST and diagonal line, because it’s the opposite of the stitch and flip unit you just completed.
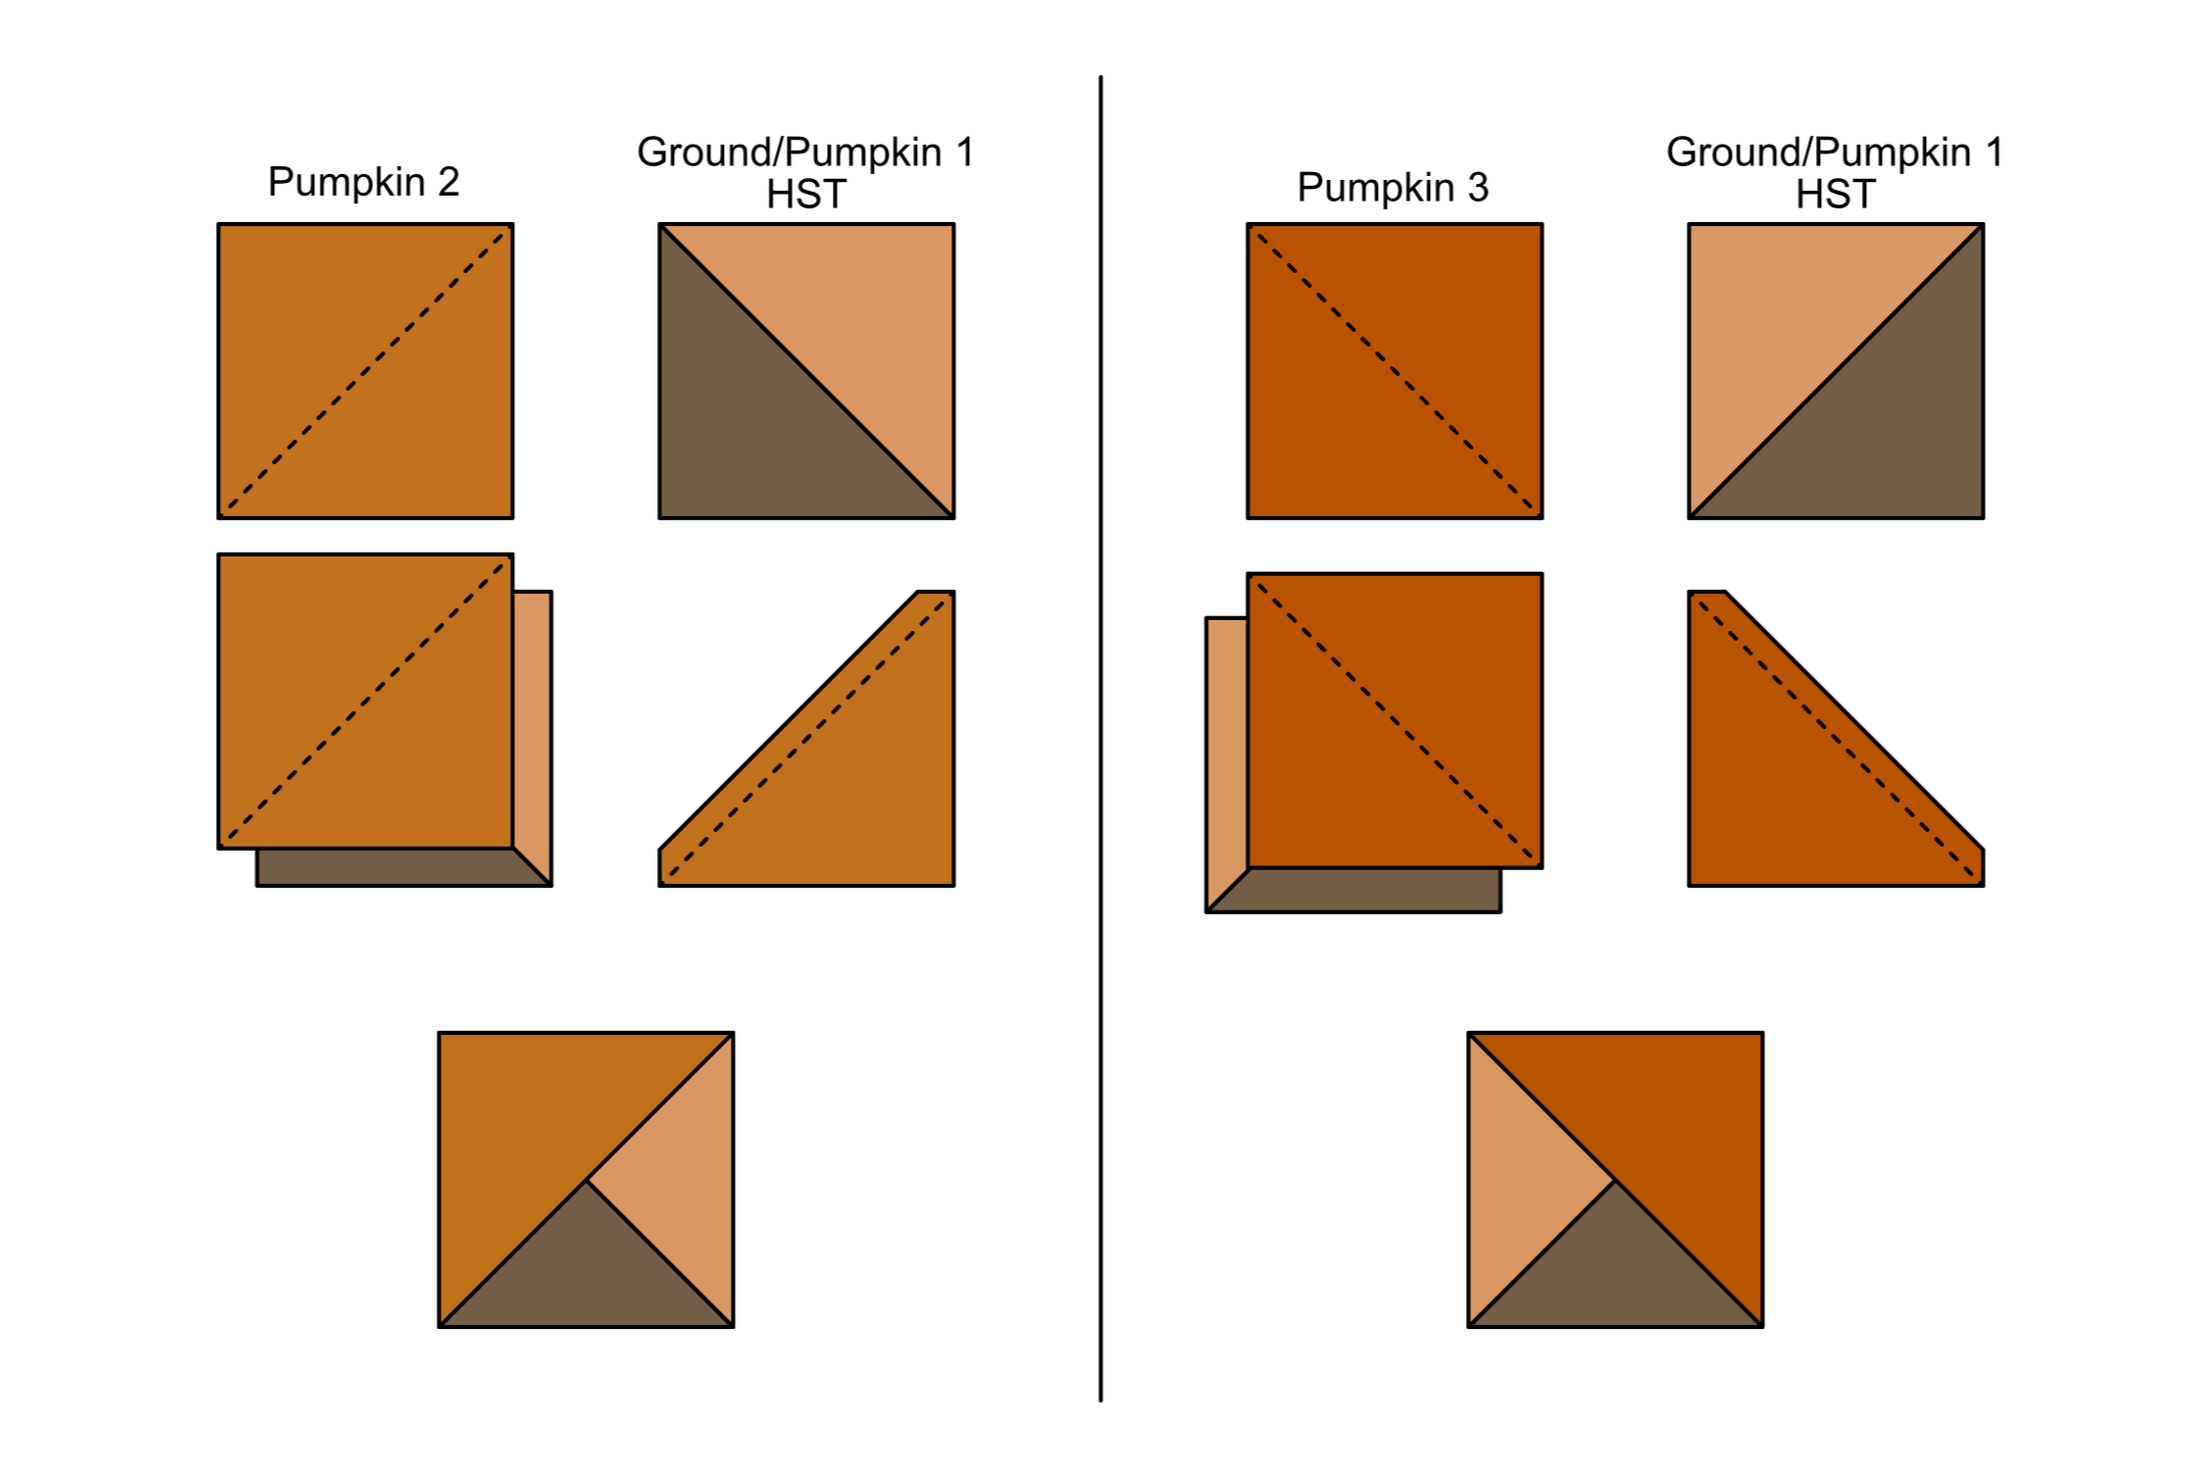
Make another stitch and flip unit pairing a 2 1/2” pumpkin 2 square with the 4 1/2” x 2 1/2” pumpkin 1 rectangle. Follow the same steps as above, this time layering the 2 1/2” square on the bottom end of the rectangle with the drawn line running from the top left corner to the bottom right corner (refer to the pictures below).
Make the final stitch and flip unit with a 2 1/2” pumpkin 3 square and a 6 1/2” x 2 1/2” pumpkin 1 rectangle. Layer the pumpkin 3 square on the bottom of the rectangle with the drawn line running from the top right corner to the bottom left corner (refer to the pictures below).


Piecing the Rows
With the half-square triangles and stitch and flip units done you can layout all the pieces and see everything coming together. This is one of my favorite parts!


Row 3 is broken down into three blocks. To sew the blocks together more easily, they have been broken down further into sub-blocks. A sub-block divides the larger block into smaller sub-sections that are then sewn together to create the bigger block. Use the diagrams below to assemble the blocks.


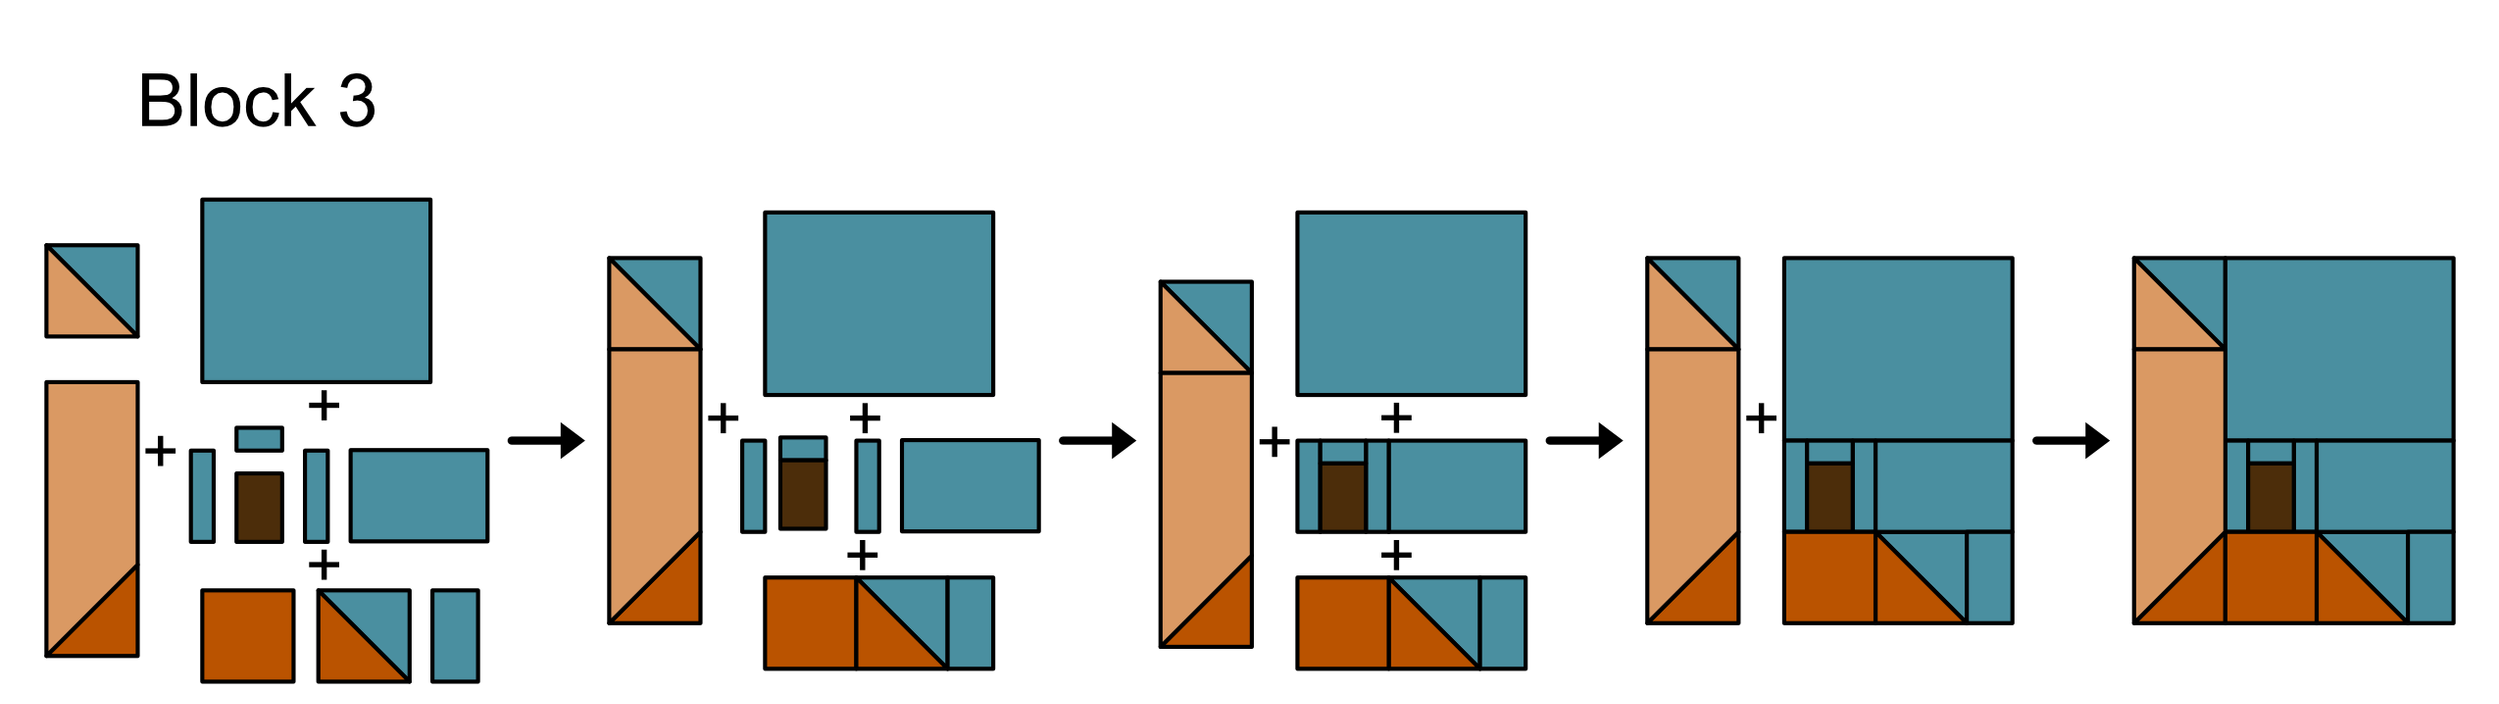
Now that all the quilt components are complete, it’s time to sew them into rows. Join the quilt components to form each row, then stitch the rows together to complete the quilt top.


The quilt top is finished! Now is the perfect time to make it your own. If you want to add a little extra personality, add applique— think jack-o-lantern faces, spooky bats flying overhead, or silhouettes of bare trees in the background. Whether you keep it simple or go full Halloween, this is your chance to add those final creative touches before quilting begins. For more information on how to do applique, read my Applique a Name on a Quilt: A Step-by-Step Guide blog post. Even though this post is specific to appliqueing a name, you can follow these same steps substituting the name for your creative applique ideas.
Quilting
With the top complete (and the applique added, if you’re going that route), it’s time to get everything layered and ready for quilting.
Quilt Sandwich
Find a clean flat surface. Start by laying out your backing fabric with the right side facing down. Smooth out any wrinkles and tape the edges in place if needed.
Next layer your batting on top, followed by the quilt top with the right side facing up. Take your time to line everything up and smooth out any bumps as you go.
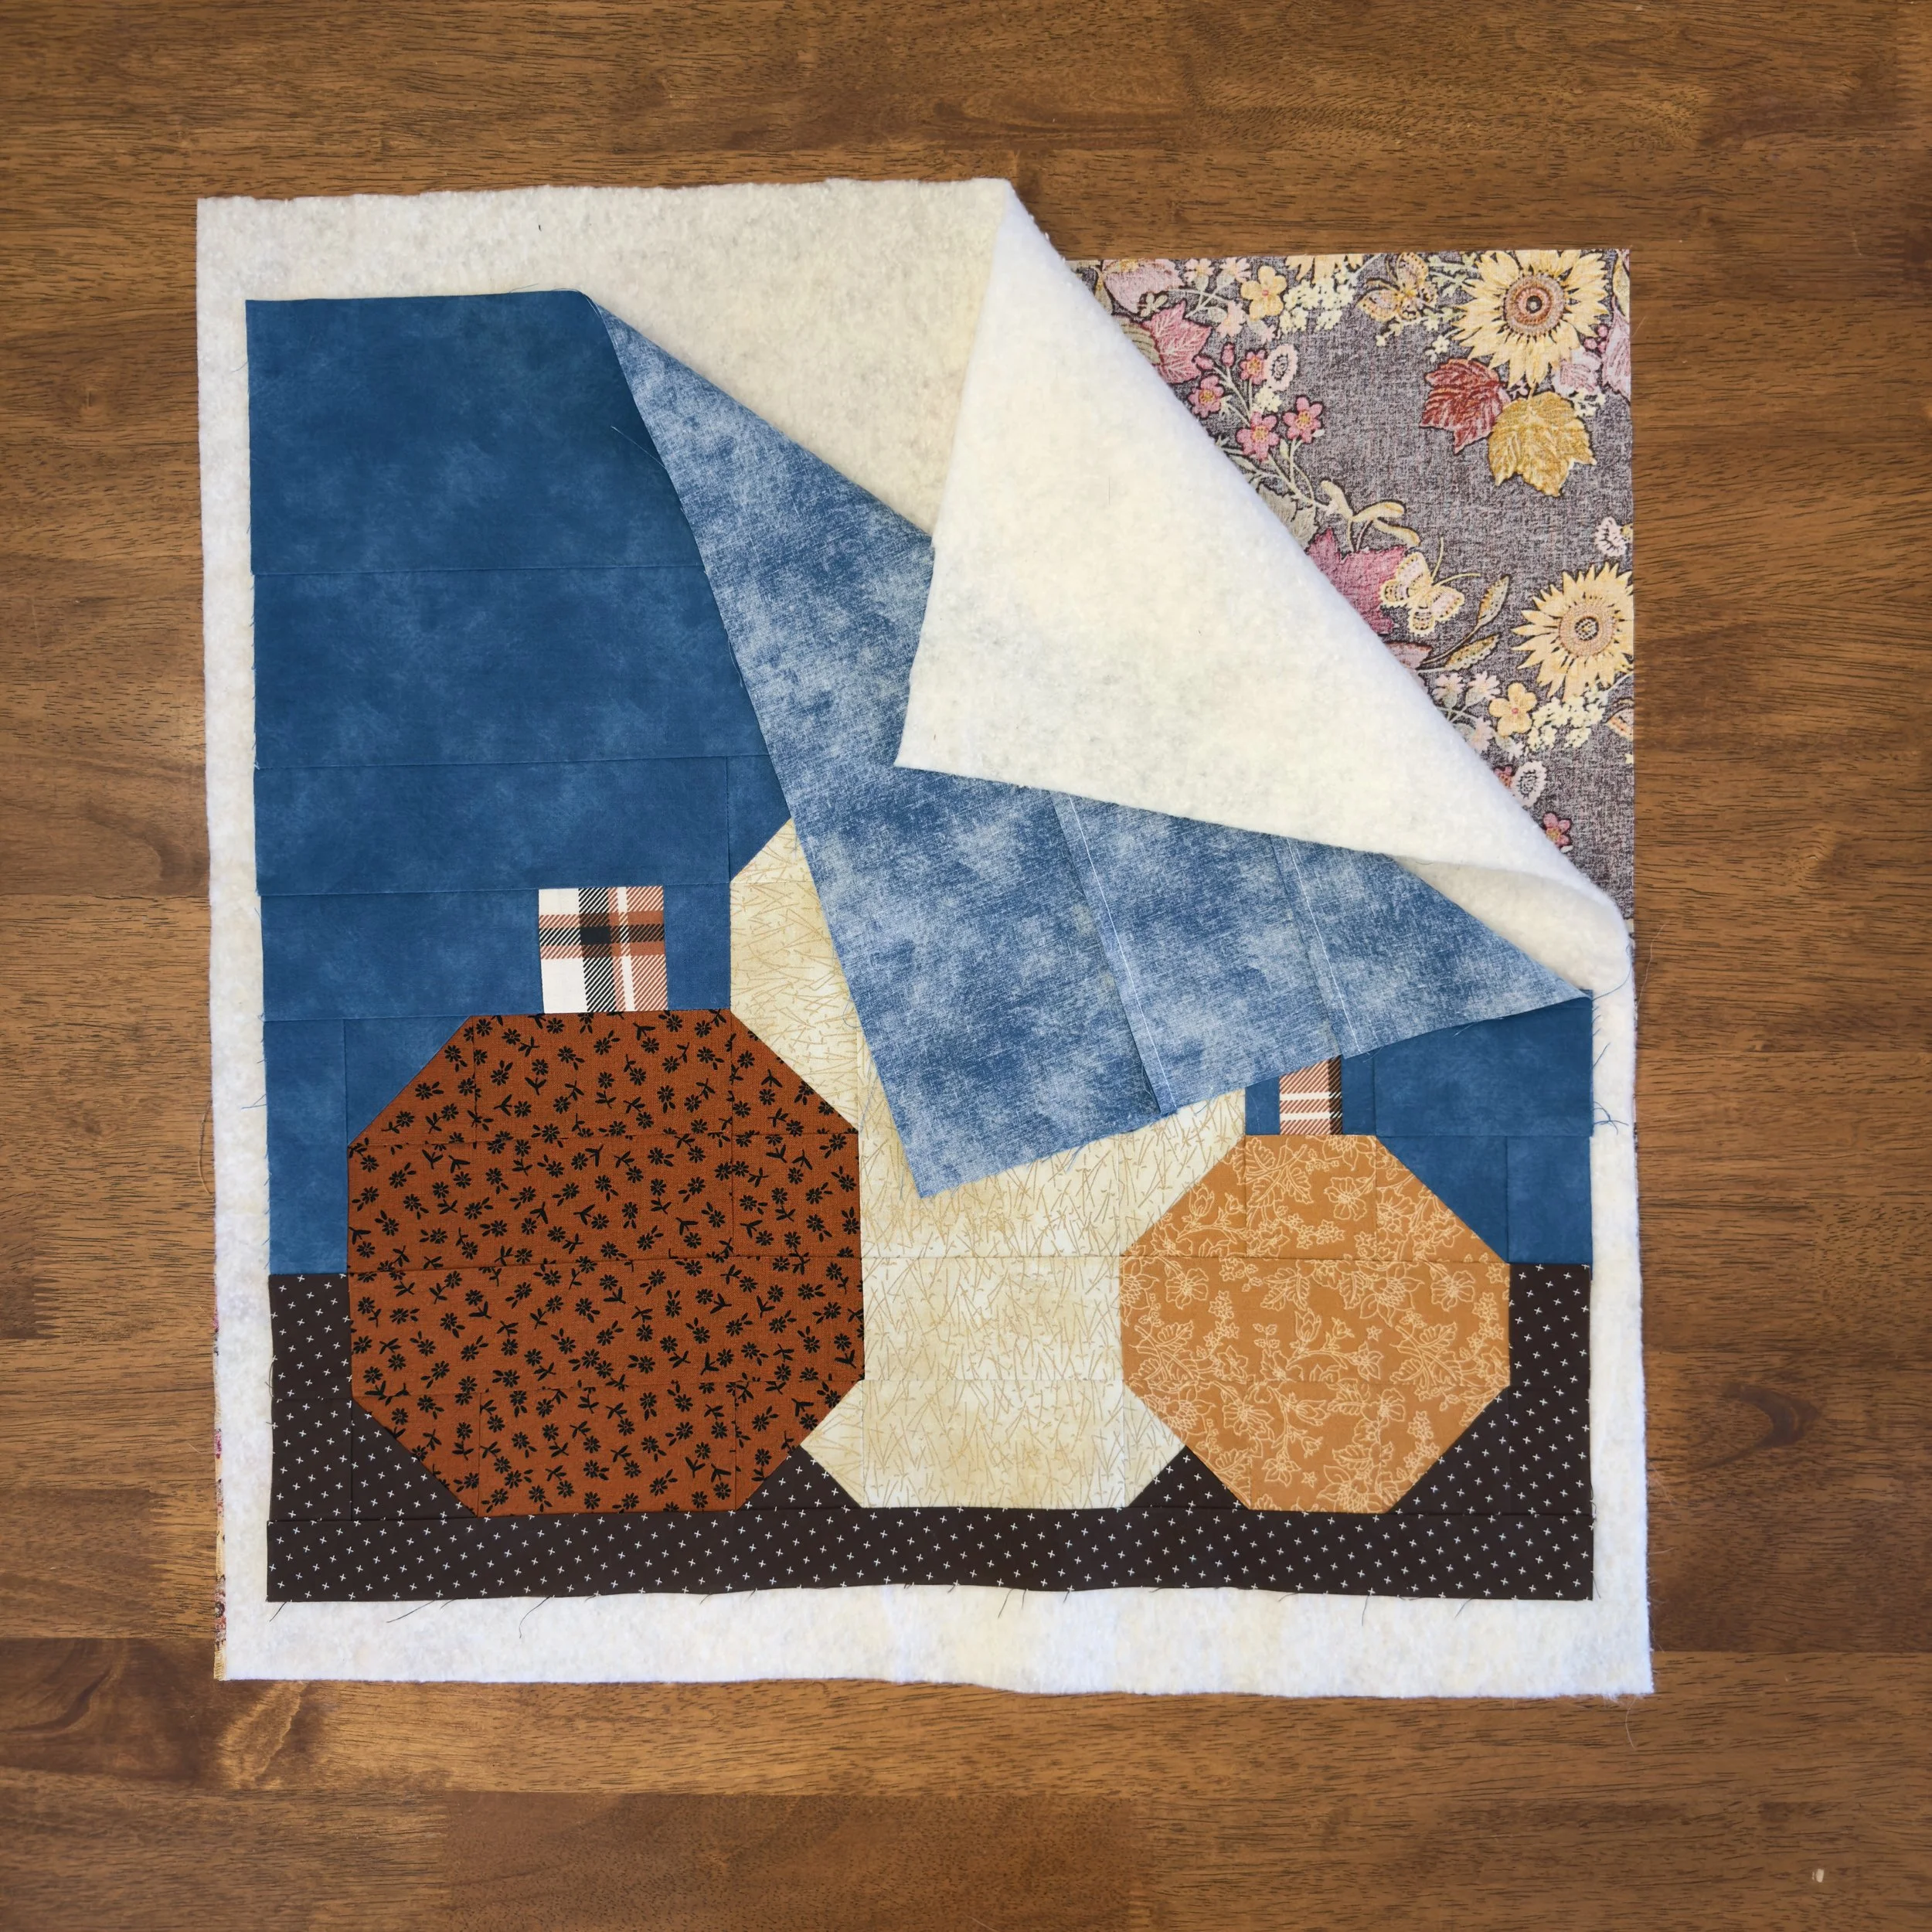
Once your layers are aligned, it’s time to baste. The goal of basting is to keep the layers from shifting while quilting. You can:
Pin baste - use curved safety pins to pin through all three layers four-six inches apart.
Spray baste - Pray the back of your fabrics with a spray adhesive and carefully smooth all the layers out.
Hand baste - sew a large running stitch to hold the layers together if you prefer a more traditional method.
Quilt It
Quilting is where everything comes together… and where I sometimes freeze up. There are so many directions you can take and choosing the “right” one can feel overwhelming. The good news? There is no wrong choice—just the one that brings your quilt to life the way you imagine it.
Here are a few quilting ideas that work nicely with this Pumpkin Patchwork quilt.
Wavy Lines - organic wavy lines can give your quilt a cozy natural texture. Best part is you don’t have to worry about sewing straight lines.
Echo Lines - stitch about 1/4” around the outside of the pumpkins to help them pop. You can repeat the echo lines a few times to create more texture. This is fun to do around any applique as well.
Free Motion - free motion quilt some spider webs, swirls, ghosts, tree outlines, loopy vines etc. to add to the Halloween vibe of the quilt.
Diagonal Crosshatch - this one is a classic. A grid of lines running diagonally across the quilt. It balances the playful quilt top with a little structure.
No matter the quilting style you choose, it will add your personal touch. Don’t worry about perfection! A little wobble will just add to the texture and charm to your quilt.
Finishing
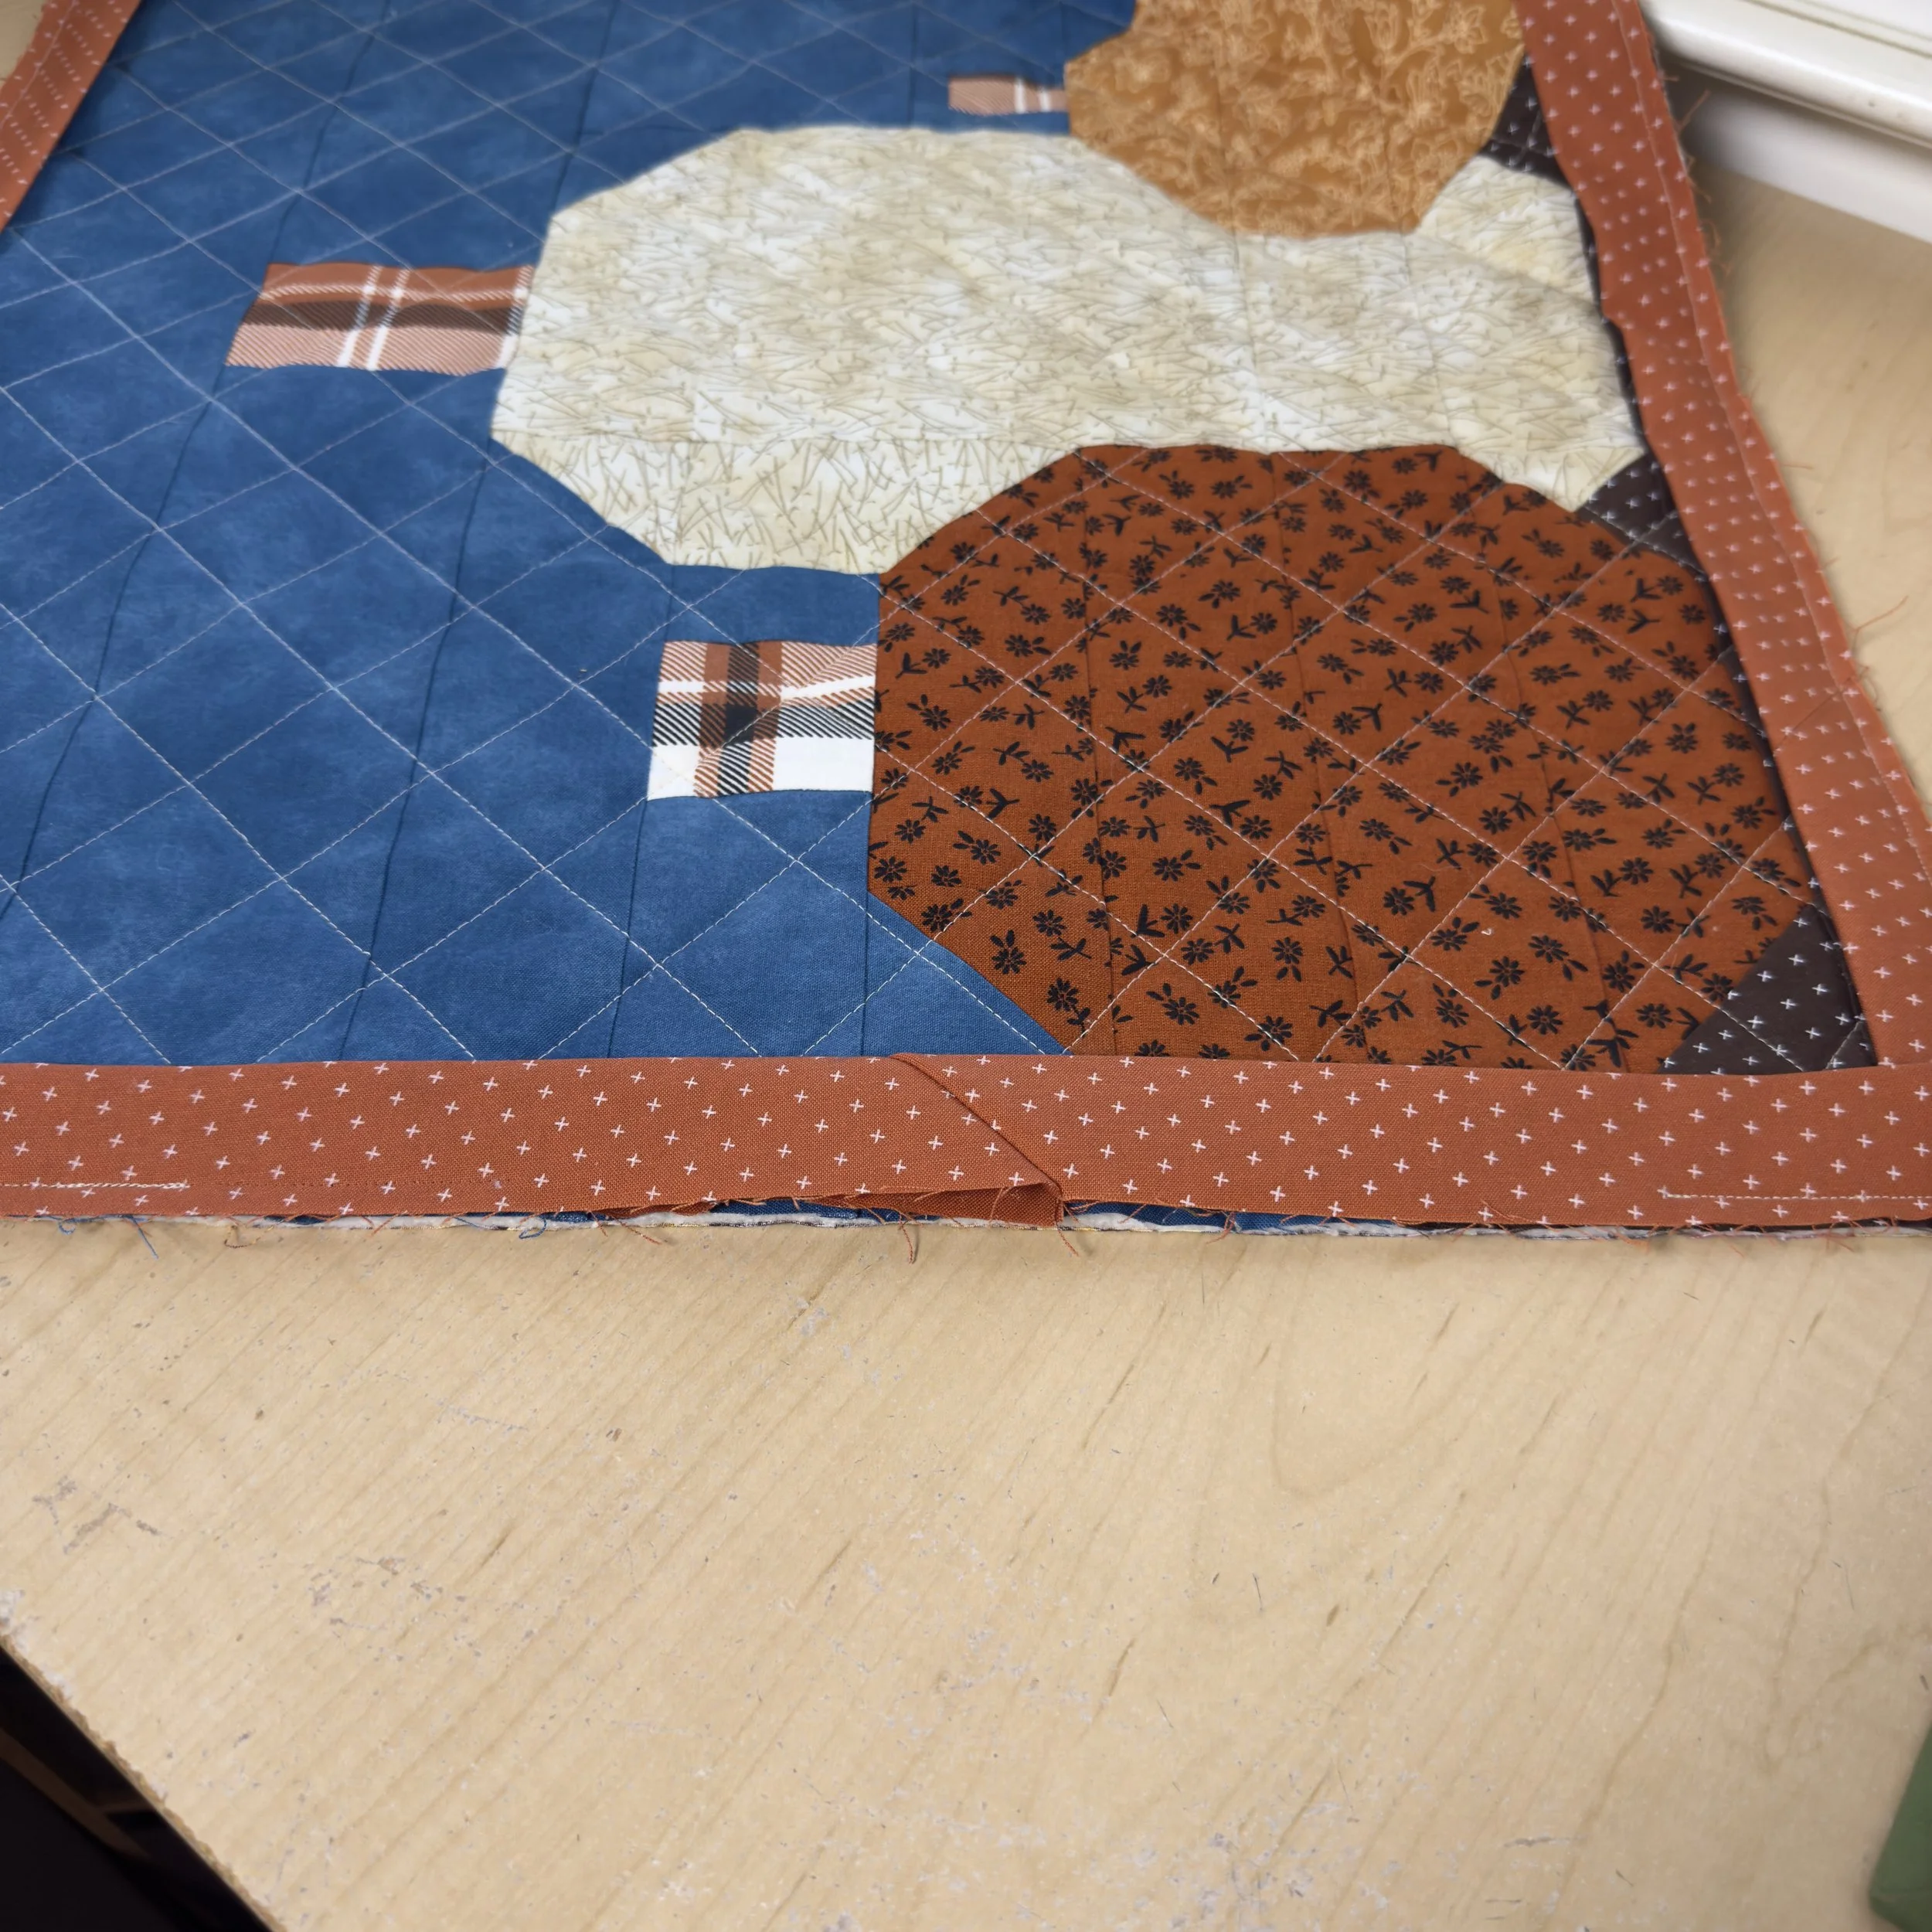
Once the quilting is done you are in the home stretch! Now it’s time to trim off the excess batting and backing and square up your quilt. Use a large square ruler and line up the corner of the ruler with the corner of your quilt. With out moving the ruler, cut down both edges of the quilt to create a 90 degree corner. Repeat this on all corners of the quilt.

Binding
Take two binding strips and lay them perpendicular to each other with right sides together. The ends should overlap so they create an “L” shape.
Using a ruler and pencil draw a diagonal line from the top left corner to the bottom right corner of the square where the strips overlap.
Pin the pieces in place and sew directly on the drawn line.
Trim the excess fabric about 1/4” away from the seam.
Flip the binding strip over and press the seam open. Pressing open helps to reduce the bulk.
Follow the above steps to attach the rest of your binding strips.
Press the entire strip in half lengthwise so that the wrong sides are together.

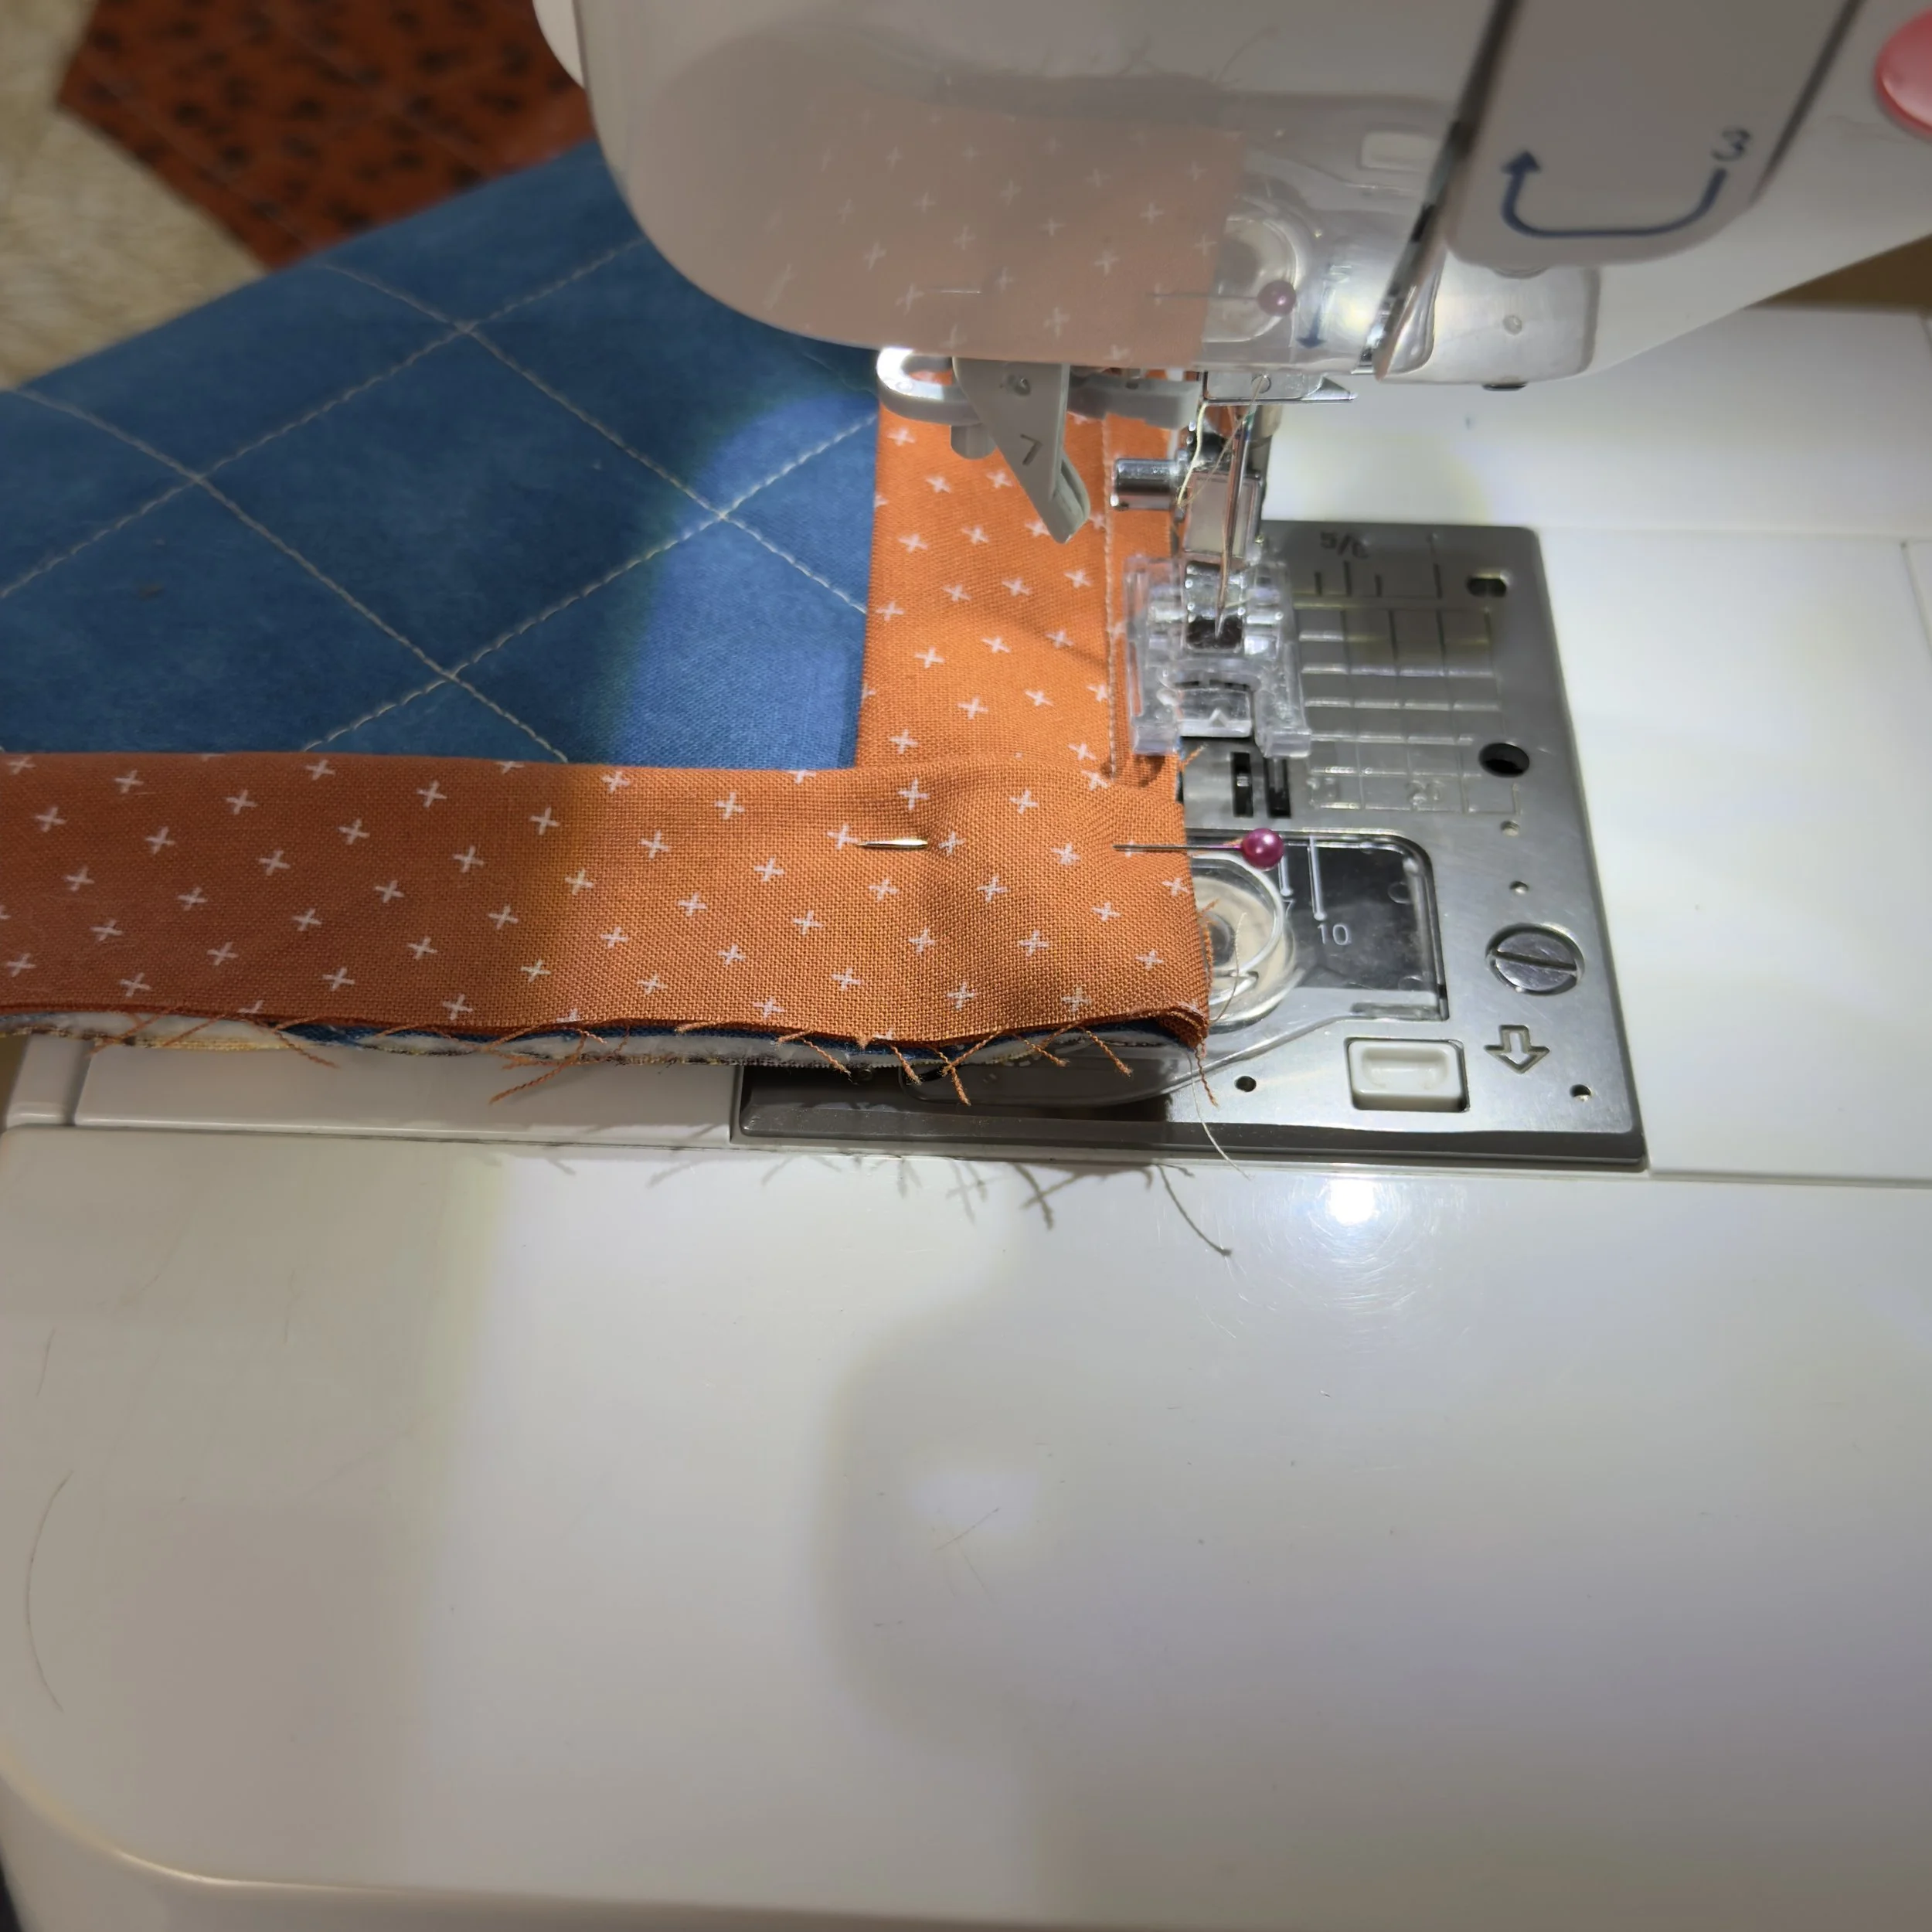
Attach the Binding
Starting in the middle of one side on the top of the quilt, line up the raw edges of the binding with the raw edges of the quilt. Leave a tail of binding before you start stitching.
Sew the binding on the quilt using a 1/4” seam allowance.
Miter the corners by stopping 1/4” before each corner. Fold the binding up and then down again at a right angle.
Continue sewing all the way around leaving a few inches unsewn at the end to join the binding ends.


Join the Ends
Overlap the binding tails and trim so they meet with a 2 1/2” overlap. Sew them together with a diagonal seam (just like when you pieced the strips together), then finish sewing the binding down.


Sew the Binding to the Back
Fold the binding over to the back of the quilt and clip or pin it in place.
Machine or hand stitch the binding down. When you reach a corner, fold one side down first, all the way to the edge. Then, fold the next side over it, creating a tidy diagonal fold at the corner.


That’s a Wrap!
The Pumpkin Patchwork quilt is all done! whether you kept it simple or added spooky applique and swirl quilting, I hope this project brought you as much joy as a crisp Autmn day. Mini quilts like this are such a fun way to play with fabric, try new techniques, and make something festive you can display year after year.
I’d love to see your finished quilt—tag me on social media @jennthorsendesigns or use #pumpkinpatchwork so I can see your hard work. Happy Quilting!
Jenn